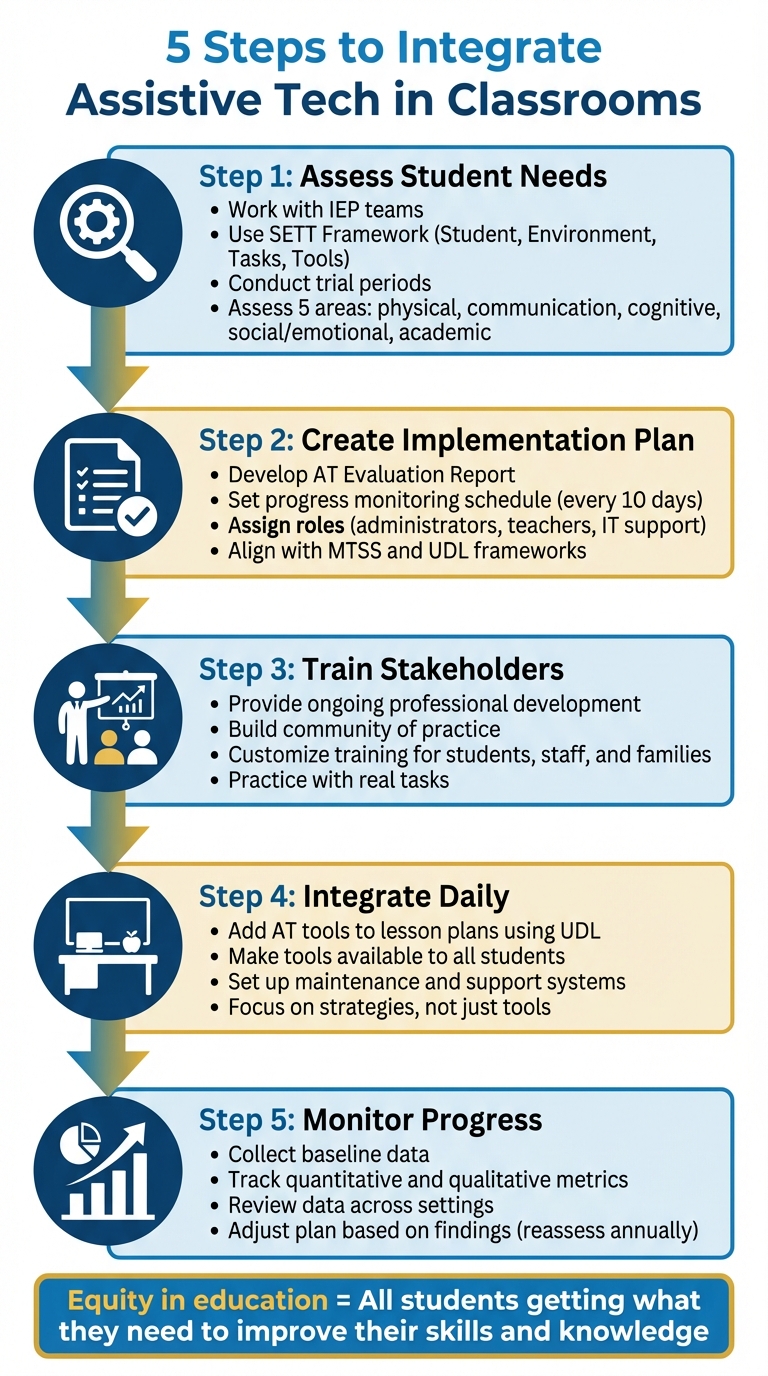
5 Steps to Integrate Assistive Tech in Classrooms
Assistive technology (AT) can make classrooms more accessible for students with disabilities, helping them engage, learn, and participate fully. To get started, here’s a simple 5-step process:
- Assess Needs: Work with IEP teams to identify student challenges and match tools to their needs using frameworks like SETT.
- Plan Implementation: Create a detailed plan that includes selecting tools, assigning roles, and setting progress tracking schedules.
- Train Stakeholders: Provide ongoing training for students, staff, and families to ensure everyone can use the tools effectively.
- Integrate Daily: Incorporate AT into everyday lessons using strategies like Universal Design for Learning (UDL).
- Monitor Progress: Regularly collect data to measure tool effectiveness and adjust plans as needed.
This approach ensures AT is used effectively to support all students' learning goals.
5-Step Process for Integrating Assistive Technology in Classrooms
Step 1: Assess Student Needs and Tasks
Work with IEP Teams
The IEP team is central to identifying the assistive technology tools that can best support a student. This group typically includes the student’s teacher, parents, the student themselves, school representatives, and specialists like occupational therapists (OT), physical therapists (PT), and speech-language pathologists (SLP). Many teams rely on the SETT Framework - Student, Environment, Tasks, and Tools - to guide their decisions. Observing the student in natural environments, such as the classroom, cafeteria, playground, or home, helps determine how effective a device might be. Before committing to a tool, trial periods are essential to evaluate how well it works, how efficiently it can be used, and whether the student feels comfortable with it. A key consideration is the student’s personal preferences; even the most effective tool might be rejected if it feels stigmatizing to the child. These steps ensure a thorough and focused needs assessment.
Conduct Needs Assessments
Start by identifying which tasks the student struggles to perform due to their disability. Assess needs across five key areas: physical, communication, cognitive, social/emotional, and academic. The process of feature matching is used to align the student's specific needs with the features of assistive technology tools.
"AT Assessment includes careful selection of devices and tools that match student needs to features of AT devices. The selected AT must be useful in the student's environment to perform needed tasks."
– Assistive Technology & Accessible Educational Materials (AT&AEM) Center
Explore a spectrum of options, ranging from low-tech tools like pencil grips and graphic organizers to mid-tech solutions such as digital recorders, and high-tech devices like specialized software or communication systems. If the IEP team lacks expertise in assistive technology, consider bringing in an AT consultant or a school technology specialist to provide additional guidance. It’s important to document every part of the assessment process, even if assistive technology isn’t ultimately implemented, as proper documentation is legally required. These records will also serve as a foundation for creating an effective implementation plan.
A Teacher's View of Assistive Technology
Step 2: Create an Implementation Plan
Once you've assessed student needs, the next step is crafting a detailed plan to put those insights into action. This plan should outline everything from selecting tools to assigning responsibilities, setting monitoring schedules, and defining success metrics. It all starts with an AT Evaluation Report, which captures the student’s current academic performance, such as reading levels and listening comprehension. This baseline data is essential for tracking progress over time.
A key part of your plan is a progress monitoring schedule. This schedule should specify how and when to evaluate whether the assistive technology is meeting its goals. For instance, teams should conduct progress checks every 10 days of instruction to assess how well the student navigates the tools and achieves their objectives. Additionally, the plan should align with established educational frameworks like Multi-Tiered System of Support (MTSS) and Universal Design for Learning (UDL). These frameworks ensure the assistive technology integrates smoothly into the general education curriculum.
"Equity in education is not all students getting the same thing, but all students getting what they need to improve their skills and knowledge." – ATAEM
Another strategy to include is the Sandwich Instructional Cycle, which uses repetition to build the student’s proficiency with assistive tools over time. This approach helps bridge the gap between assessment findings and practical classroom application.
Assign Roles and Responsibilities
Clearly defining roles is crucial to ensure the implementation process runs smoothly. The team should include the student’s parents, general education teachers, special education staff, and specialists like occupational therapists or teachers for visually impaired students. Each member plays a specific role:
- Administrators: Handle procurement, organize staff training, and oversee technical support.
- Teachers: Integrate the tools into daily instruction and follow structured teaching cycles to help students master their assistive technology.
- IT Support: Ensure tools function properly and identify who will address technical issues, whether it’s an internal team or an external vendor.
Make sure support materials are accessible in the necessary languages to meet the needs of all families. Collaboration among team members is essential for providing well-rounded support.
"Ensuring teams are working together to provide holistic support to students and families now and moving forward into delivering education post-pandemic." – American Foundation for the Blind
Without a structured plan and consistent support, students may not fully benefit from the technology, which can hinder their independence and confidence.
Choose the Right Tools
Using the SETT framework from the earlier assessment, match tools to the student's specific needs. For example, a student struggling with decoding might benefit from text-to-speech software like Natural Reader.
Before making a final decision, conduct dual evaluations to test how the student responds to both human and computerized voices for text-to-speech software. This ensures the chosen solution is the most effective for their learning style. Additionally, assess whether the student can navigate the tool independently or if further training is needed.
Start by incorporating universally accessible tools - like digital text and graphic organizers - into general instruction (Tier 1). From there, move to more specialized tools as needed.
When selecting tools, focus on specific features rather than general products. For instance, instead of simply choosing MS Word, identify whether the student needs its spell-check or text-to-speech functions. Administrators should maintain a comprehensive list of all assistive technologies used in the school to ensure compatibility with the curriculum.
Step 3: Train Students, Staff, and Families
Once the plans are in place, the next crucial step is training everyone involved - students, staff, and families - so they can effectively use the technology. Training isn’t a one-time event; it’s an ongoing process that needs to be tailored to the needs of each group. Tracy Gray from the American Institutes for Research underscores this with her straightforward advice:
"Professional development, professional development and professional development. I can't stress it enough".
Relying on a single workshop or training session simply doesn’t work. Instead, schools and districts should provide continuous group and one-on-one training opportunities for teachers and support staff throughout the year.
Building a community of practice is another effective approach. This setup allows educators and resource staff to share strategies, exchange ideas, and learn from each other’s experiences. It’s a practical way to honor the expertise of seasoned staff while integrating new technology. Instructional coaching, where specialists work directly with teachers, is particularly effective and often more impactful than traditional workshops.
Students should also be encouraged to explore and experiment with the new devices. Diane Moog, a teacher at Montana School for the Deaf & Blind, suggests:
"Give [students] opportunities to play with, explore and demonstrate what these new devices can do... chances are, they'll figure out and show you things you'd never figure out on your own".
Since students often have a natural fluency with technology, they can uncover creative uses for tools that educators might not think of. This ongoing training ensures that every stakeholder - students, staff, and families - can confidently use the technology in ways that meet their specific needs.
Customize Training for Each Group
Training needs to be tailored to each group’s role and their comfort level with technology. For staff, focus on areas like instructional coaching and how to use data effectively. For students, emphasize independent tool selection and practical, hands-on activities. Families, on the other hand, benefit from clear instructions, technical support, and user-friendly guidance.
Engaging families can be particularly challenging. Barriers like busy schedules, unfamiliarity with educational terms, or negative past experiences with schools often get in the way. To overcome these hurdles, consider offering virtual meetings to eliminate transportation issues, using text-based systems for those with limited internet access, and avoiding jargon in communication. Robin Lowell, a math teacher at Washington State School for the Blind, offers this reminder:
"Whatever technology you choose to use and however you choose to use it, make sure it has a purpose and that it truly meets the students' unique needs".
Tailoring the training to each group ensures that everyone feels supported and capable of using the tools effectively.
Practice with Real Tasks
Hands-on practice is key to making training stick. Team members should have access to the same software and hardware that students will use. This makes the training practical and directly applicable to their daily tasks. Create opportunities for students to practice selecting the best tools for specific situations, helping them build confidence and decision-making skills.
One powerful way to involve families is by having students demonstrate their assistive technology tools at home. This not only empowers students but also helps families see how the tools work in real-life scenarios. Recording training sessions is another helpful step, allowing participants to review the material whenever needed.
Finally, it’s important to present assistive technology as a resource for all students - not just those with disabilities. This reduces stigma and ensures that these tools are seen as valuable learning aids for everyone. Hands-on, practical training ensures that these tools are used effectively and meet the unique needs of each student.
sbb-itb-4f1eab7
Step 4: Use Assistive Technology in Daily Classroom Activities
Once the training phase is over, the real challenge begins: seamlessly incorporating assistive technology (AT) into everyday classroom routines. The goal is to stop seeing AT as something "extra" or exclusive to students with disabilities. Instead, these tools should be viewed as resources that can enhance learning for all students. As Chris Bugaj, host of AT Tips Cast, explains:
"The strategy first instead of the tool because the tools often change... Tools may change, but effective strategies endure".
This principle should guide every decision, from lesson planning to ongoing support. Focus on what students need to achieve - whether it’s organizing ideas or grasping complex material - rather than fixating on specific devices or software that may evolve over time. By embedding these strategies into lesson plans, you create a consistent and lasting impact.
Add AT Tools to Lesson Plans
To make AT a regular part of your teaching, integrate it directly into your lesson plans using the Universal Design for Learning (UDL) framework. This approach ensures AT benefits everyone, not just specific groups of students. For example, in a reading lesson, enabling text-to-speech for the entire class can be a game-changer. Research shows that listening to text while following along with highlights improves reading skills, especially for struggling readers. This method is particularly helpful for students with dyslexia, which affects about one in five students, but it can also support students who process information better by listening.
For writing tasks, consider setting up quiet areas with computers equipped with speech-to-text software. This allows students with dysgraphia or dyslexia to dictate their answers without distractions. Tools like digital highlighters can also help students with executive function challenges organize notes or sort vocabulary by topic. As Mike Marotta, co-author of Inclusive Learning 365, points out:
"Built-in accessibility features are a hidden gem in all our technology tools. They exist in every device we have, yet many people don't even know that they are there".
Features like "Speak Selection" on iPhones or closed captioning in Google Slides and PowerPoint are already available and don’t require additional costs. During lessons, apply the Sandwich Instructional Cycle (SIC): introduce the skill, let students practice using the AT tool, and then assess their mastery.
Set Up Maintenance and Support
For AT tools to remain effective, they need proper upkeep. Once these tools are part of daily routines, it’s essential to ensure they’re functional and reliable through consistent maintenance and support. Start by assigning clear roles within your team: Who will collect data on tool usage? Who will monitor device performance? Who will adjust strategies if a tool isn’t working effectively? These responsibilities might fall to AT specialists, speech-language pathologists, educational audiologists, or IT staff. As the American Speech-Language-Hearing Association (ASHA) explains:
"Designate which team members will do what roles (e.g., assistive technology specialist, educational audiologist, SLP). For example, who will collect the data? Who will monitor the use of a certain assistive technology tool? Who will track the success or failure of this tool, adjusting as needed to ensure effectiveness?"
Plan for deeper maintenance during school breaks - summer, winter, and spring - when IT teams can clean, repair, or replace equipment, and perform software or network updates. Jamie Martin from Vartek advises:
"Over the summer and during breaks, your Technology staff should present and implement a plan for disconnecting equipment and devices to allow custodial crews to clean; repairing or replacing broken machines; and installing software, server, and network upgrades to keep the infrastructure robust and reliable".
To avoid outdated devices, create a Strategic Ed Tech plan that includes a dedicated budget and regular schedules for replacing equipment. For students with Individualized Education Programs (IEPs) requiring AT, remember that Local Educational Agencies (LEAs) are legally obligated to provide, fund, and maintain these tools. Collaborate with your school’s IT department and State AT programs to borrow or test devices before making purchases. This "try before you buy" approach ensures informed decisions and avoids unnecessary expenses. A solid maintenance plan supports the smooth integration of AT into classrooms, ensuring these tools remain effective and accessible for all students.
Step 5: Track Progress and Measure Results
Once you've planned and trained, the next step in assistive technology (AT) implementation is tracking progress. Setting up the technology is only part of the job - measuring how well it works is just as important. Regularly collecting and analyzing data helps confirm whether the tools are meeting the student's goals. This information allows you to make informed decisions about what’s working, what needs adjustment, or what might need to change entirely.
Collect and Review Data
To measure progress effectively, you need a clear starting point. Begin by gathering baseline data that reflects the student’s abilities without the use of assistive technology. This could involve assessing things like reading speed, listening comprehension, or their ability to navigate independently. Establishing this benchmark ensures you have a reliable comparison for later evaluations. When tracking progress, it’s crucial to replicate the same conditions - such as task type, time limits, and environment - that were used during the baseline assessment.
Data collection should be a team effort, involving teachers, therapists, and parents. Each person should have clearly defined roles to ensure consistent tracking and accountability. As noted by the Quality Indicators for Assistive Technology Services, this collaboration prevents gaps in monitoring and ensures a comprehensive view of the student’s progress.
It’s important to track both quantitative and qualitative data. Quantitative metrics might include measurable factors like task completion speed, accuracy rates, how often the tool is used, and the amount of time the student works independently. On the other hand, qualitative data focuses on more subjective elements, such as the student’s satisfaction, teacher observations, preferences, and the overall quality of their work. As highlighted by the Quality Indicators for Evaluation of the Effectiveness of Assistive Technology:
"Changes identified by the IEP team for evaluation may include accomplishment of relevant tasks, how assistive technology is used, student preferences, productivity, participation, and independence, quality of work, speed and accuracy of performance, and student satisfaction, among others".
To get a full picture, collect data across different settings, including general education classrooms, resource rooms, and even at home. A tool that works well in one environment but fails in another may not be meeting the student’s full needs. Regular monitoring is essential, especially during the 6–8 week trial period often used for new AT implementations. This allows teams to spot and address issues early on.
Adjust the Plan Based on Data
Once you’ve collected the data, use it to make sure the assistive technology is truly helping the student. If it’s not, adjustments need to be made. As the Quality Indicators for Assistive Technology explains:
"Implementation should be changed when data indicate it is not successful and decisions about change are based on data review and analysis".
Start by identifying specific challenges. These might fall into one of four areas: operational (how the tool functions), functional (how it supports the student’s tasks), strategic (how the student uses it), or social (how it fits into their interactions). Sometimes the problem isn’t the tool itself but external factors like insufficient staff training, equipment maintenance issues, or an environment that isn’t conducive to the tool’s use.
Make changes quickly to keep the student on track. For example, you might need to adjust how the tool is introduced, starting with modeling its use, then providing guided practice, and finally encouraging independent use on grade-appropriate tasks. In some cases, it may even be necessary to replace the tool with one that better fits the student’s needs.
Reassessing the tool’s effectiveness at least once a year, before the student’s Annual Review, is also critical. This ensures that the technology continues to meet the student’s evolving needs. As the Quality Indicators for Assistive Technology points out:
"Evaluation of effectiveness is a dynamic, responsive, ongoing process that is reviewed periodically".
Conclusion
Using assistive technology in your classroom isn't about piling on extra work - it's about building a system of support that ensures every student can access and engage with the curriculum effectively. By following the five key steps - from assessing needs to tracking progress - you establish an inclusive structure where technology seamlessly blends into daily learning. This approach helps avoid the stigma of "special" accommodations, making these tools a natural part of the learning process for everyone.
When these steps are in place, you're creating a learning environment that actively removes obstacles and provides essential support. As Carol Tomlinson, a prominent advocate for differentiated instruction, explains:
"Differentiation really means trying to make sure that teaching and learning work for the full range of students, which really should be our goal as teachers".
Equity in education isn't about giving everyone the same tools - it's about ensuring each student gets what they need to succeed.
Assistive technology becomes most effective when it's woven into every layer of instruction and made available to any student who can benefit. Whether it's tools like text-to-speech software, graphic organizers, or even something as simple as pencil grips, these resources cater to diverse learning styles and allow students to demonstrate their abilities in ways that work best for them. Considering that around 20% of students experience dyslexia or other language-based learning challenges, these tools aren't just helpful - they're essential.
To continue integrating assistive technology effectively, strategic planning and consistent effort are key. Start small and build gradually. Use the SETT Framework (Student, Environment, Task, and Tool) to align the right technology with specific learning challenges. Make these tools available to the entire class to normalize their use and foster a supportive atmosphere. Providing ongoing support ensures these tools become meaningful aids rather than underutilized resources.
FAQs
How can teachers integrate assistive technology without making students feel singled out?
Teachers can integrate assistive technology into the classroom seamlessly by making it part of everyday activities. When these tools are presented as standard resources for learning - available to everyone - they become less likely to stand out or cause feelings of stigma among students who rely on them.
Educators also play a critical role in shaping how these tools are perceived. Proper training can help teachers introduce assistive technology in ways that promote inclusivity. By framing these tools as supports for all learners, they can create a welcoming and positive environment. Encouraging students to experiment with and use the technology themselves can further boost their comfort and confidence, making it feel like a natural part of the learning process.
How can teachers and families be trained to use assistive technology effectively?
Helping teachers and families confidently use assistive technology is essential for making it work in classrooms. For educators, prioritize continuous professional development. This can include workshops, hands-on practice, and access to the latest resources. Encouraging peer collaboration is also important - experienced staff can share insights, offer practical tips, and work together to solve any challenges.
Families play a big role too. Invite them to training sessions so they can learn how to support their child’s use of assistive tools at home. Offer clear, step-by-step instructions and materials designed with their needs in mind. When schools combine training, teamwork, and family involvement, they build a strong foundation for assistive technology to thrive.
How can schools evaluate whether assistive technology is helping students achieve their learning goals?
Schools can measure how well assistive technology (AT) is working by tracking and analyzing data on student progress and engagement. This might involve comparing performance before and after introducing the technology, using tools like assessments or progress trackers. For instance, educators can look for improvements in specific skills, increased participation, or even higher satisfaction levels.
Another useful approach is collecting feedback from students, teachers, and parents. Observing how the technology is used in different classroom settings can also provide valuable insights. Frameworks like SETT (Student, Environment, Tasks, Tools) are especially helpful for determining if the technology aligns with individual needs and learning goals. Regular reviews and adjustments ensure the AT continues to support students effectively.